Frog Heart Experiment
Rob MacLeod, Brian Birchler, and Cris Lapierre
February 14, 2008
To examine the effects of temperature and various drugs on
the frog heart muscle, specifically contraction strength and heart rate.
There are a number of external influences that can affect cardiac output.
Some of these are mediated by the autonomic nervous system and others are a
response to changes in temperature and ionic concentrations. For
background, look in your textbook for information on the effects of
neurotransmitters on cardiac rate and contraction (pages 477-479 and
512-523). We will use drugs in the lab that either are neurotransmitters
or act through other mechanisms to alter the physiology of the whole heart.
There are a number of excellent web sites you can peruse to find background
information relevant to this lab. We will cover some basics in class, but
please at least go through the virtual dissection site at
curry.edschool.virginia.edu/go/frog/Frog1/menu.html.
The full list of web sites to visit include:
2.1 Materials
The equipment required consists of:
Figure 1:
Photograph of the front and back panels
of the ETH-256, dual channel amplifier.
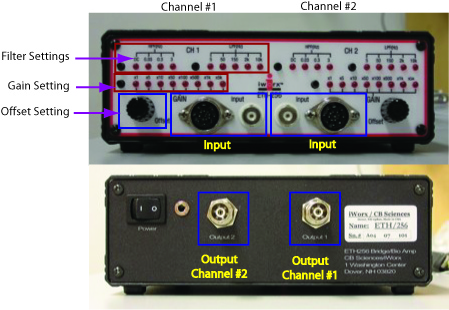 |
The photos in Figures 1 show the dual channel amplifier
that we will use in this lab (and others to follow). Dual channel means it
can individually amplify two independent input signals. Note the paired
input connectors and the fact that either channel can take either a force
transducer or just measured biopotentials. When used with the force
transducer, the amplifier provides the power to drive a bridge circuit for
accurate readings of deflection of the transducer blade.
Note also that the outputs from the amplifier are on the back of the unit,
as are the power switch and power cable connector.
Figure 2:
Photograph of the force transducer and
bipolar measurement electrode.
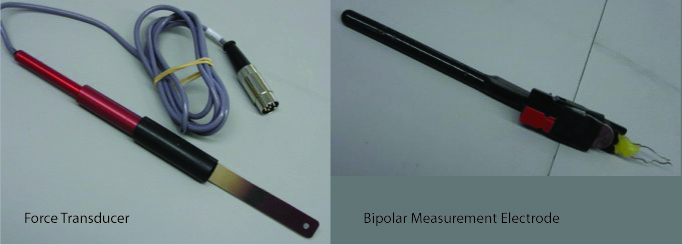 |
Figure 2 shows the force transducer and bipolar electrodes
that are the main sensors we will use. Resistors connected to the force
transducer blade change resistance proportional to the amount of
deflection. These resistors, in turn, are part of a bridge circuit, which
produces a change in output voltage proportional to blade deflection. The
bipolar electrode consists of two wires that we will place in contact with
the heart (or other electrically active tissues) and detect the potential
difference between the wires (a lead).
Note that both instruments are fragile so treat them with care.
Figure 3:
Circuit diagram for the recording of
contraction and electrograms from the frog heart.
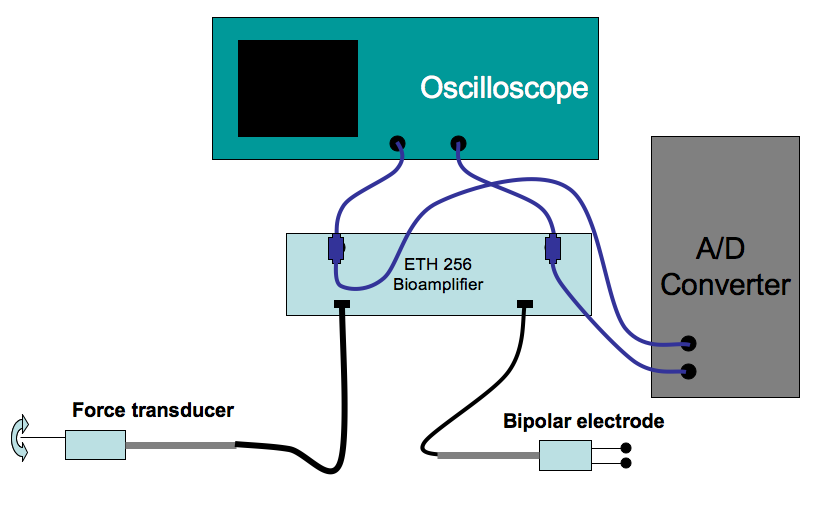 |
Please carry out the following steps (Note Do not start the frog
dissection until you have completed all the setup steps!):
- Setting up the measurement circuit according to
Figure 3:
- Connect the force transducer to the CH 1 8 pin DIN input of the
ETH-256 dual channel bioamplifier.
- Place a T-connector on the corresponding output of the
bioamplifier and then connect one end to the input (CH 1) of the
oscilloscope and the other to the input (0) for the computer A/D
converter using BNC cables.
- Adjust the settings on the bioamplifier to get a clean signal
on the oscilloscope in which you can see the response to
gentle bending of the force transducer. Start with the
following settings on the bioamplifier:
- Low pass filter (LPF) at lowest frequency setting
- High pass filter (HPF) at DC
- Gain at x5
On the oscilloscope, try the following settings (make sure
all settings are in calibrated mode, i.e., latched into fixed
settings):
- DC coupling
- 200 mV/div
-
mathend000# 0.5 s/div
- Launch the acquisition program (
C:\bioen\CB8ChanScop)
computers for acquiring the signals. Then select sampling
parameters from the program (sampling rate of 100-200 is adequate)
and run it to make sure it acquires a signal. Note: Once
you have obtained a clean signal, record all settings (amplifier
and CB8ChanScope) in your lab notebook. If you ever change a
setting, make a note of the new setting and when you changed it in
you notebook as well.
Figure 4:
Calibration of the force transducer.
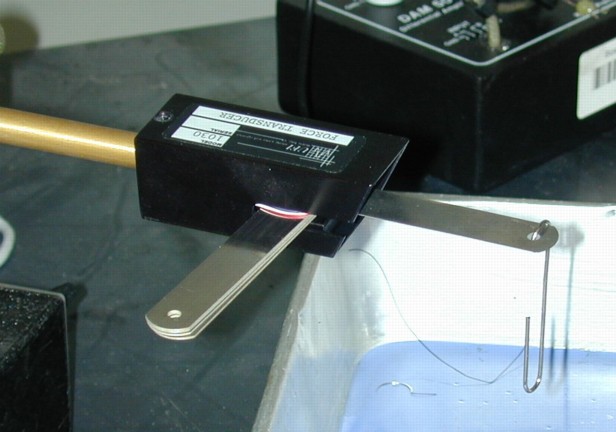 |
- Calibration of the force transducer (see
Figure 4):
- Mount the transducer in the magnetic stand and rotate the
transducer so the flat side of the blade is parallel (horizontal)
to the table; deflections in the up and down direction should cause
the signal on the oscilloscope to change.
- The zero-offset is controlled via the offset knob on the
bioamplifier. Adjust the offset accordingly to make maximum use of
your recording range. Because we do not anticipate bi-directional
movement of the transducer blade (the heart only tugs in one
direction), setting the offset to zero will waste half our recording
range. Therefore set the offset such that the entire voltage range
displayed on CB-Scope (and the oscilloscope) is utilized.
- Weigh a set of 3-4 paper clips of different sizes and then hang
them alone and in combination from the transducer blade and note
the total weight and the associated deflection of the signal on the
oscilloscope (or CB8ChanScope). The resulting table of values will
be the basis for calibration of the transducer.
- When you are done, rotate the blade of the
transducer back into the vertical orientation and,
if necessary, reposition the offset. You should now be ready
to perform the measurements of the contracting heart.
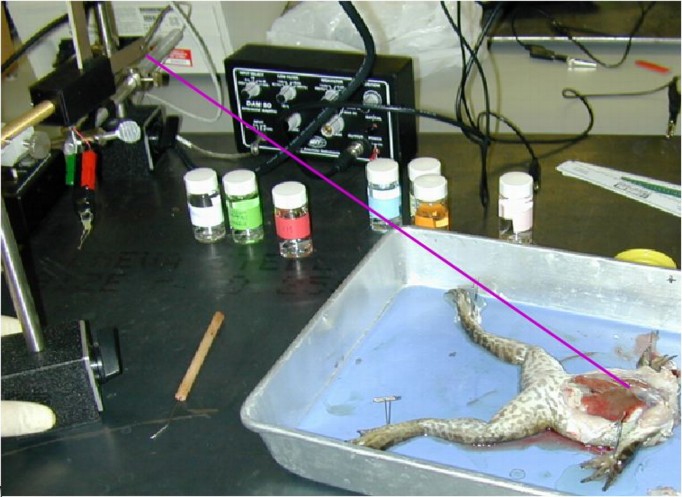
Once you have everything set up and the force transducer calibrated, you
can move on to the frog preparation as follows (see
Figure 5)
Figure 5:
Dissection of the frog showing the open
skin flaps, the removal of the sternum and, underneath, the exposed
heart inside the pericardial sack.
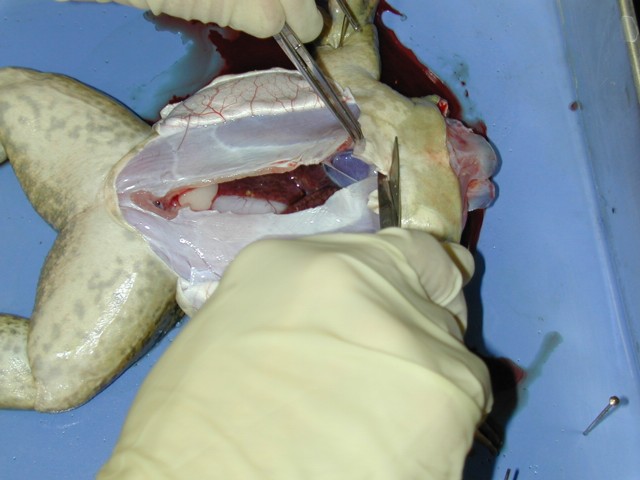 |
- Obtain a pithed frog from the lab TA/Instructor and fix the frog on
its back using the big needles in the pan. Open the thorax of the frog
with a central incision and two flaps, which is also shown nicely
through a series of images in the web site
curry.edschool.virginia.edu/go/frog/Frog1/menu.html. Go to
the point of the Layer One section and focus on the heart. The point
here is not to perform a detailed dissection but to make you familiar
with the general anatomy and comfortable with the preparation of the
animal. Do not cut or remove any organs other than the skin
and some of the ribs covering the heart.
- To expose the heart, make sure to remove the lower and middle
sections of the rib cage as they will interfere with the transducer you
will use to measure contraction. Cut low enough so that added drugs
are able to drain from the thorax. The heart of the bullfrog is quite
large and red and should be slowly beating. Figure5
shows the process of removing the ribs and sternum with the exposed
heart below. If the frog is still cold, the rate may be very slow so
run some Ringer's solution over the heart to help it warm up. Observe
the atria and single ventricle of the heart and note the sequence of
contraction of each.
- Once the heart is open, regular apply a few drops of Ringer's
solution to keep is moist.
- If you have a camera available, take photos of the thorax and mark
organs on them. If you do not have a camera, find images from a
classmate and label them for your lab report.
Figure 6:
Photo of the complete frog preparation
including the thread connecting the heart to the transducer.
 |
- Attaching transducer to the frog (See Figure 6):
- Very carefully, cut open and remove the pericardium from the
heart so you can see it fully exposed.
- Using the curved needle and suture provided, run the needle
through the lower part of the ventricle, about 3-5 mm from the
apex of the heart, and tie a loop with the suture thread. Then
clip off the needle and discard it carefully in the sharps
container (red plastic). Run the other end of
the suture through the hole in the transducer blade and tie a knot
there as well. Make sure there is at least 30 cm of suture
available between the heart and the force transducer.
- Place the transducer at the end of the pan, elevated about
about 20 cm above the table surface with the blade oriented
perpendicular to the thread. The thread from the frog heart to the
transducer should be quit flat (horizontal) so that you apply
tension to the long axis of the heart. See
Figure 6 for reference.
- Use alligator clips to attach a wire between the metal
dissection tray and the large metal plate on which you are working.
This can reduce the electrical noise levels substantially when we
start to perform electrocardiographic measurements.
- Now apply enough tension to the thread such that you see a
signal on the oscilloscope that reflects the contraction of the
heart. Sensitivity of the oscilloscope should be in the range of
200-500 mV/div. Adjust location and tension so as to generate as
clean a signal as possible, ideally one that reveals the separate
components of atrial and ventricular contractions. Make sure the
tension of the thread is just enough to pull the thread taught and
lift the heart slightly. Check also that there is no obstruction
from the side of the pan or any other object. Place the pan and
the stand well away from the edge of the lab bench and always be
careful not to touch the post or the thread accidently. Otherwise,
any change in orientation will alter the resting tension and the
reference signals, which will add error to subsequent measurements.
There are a set of interventions that you should carry out to see how the
heart responds to external stimuli, both mechanical and chemical.
Now try and replicate the effect of the Frank Starling mechanism with the
preparation by measuring contraction and progressively stretching the heart
to simulate the effect of increased venous return.
- Arrange the pan and transducer so that there is just enough tension
for the thread to clear the edge of the pan (adjust the height of the
transducer if necessary) and for you to get a contraction signal. Take
this as the baseline value and make a 5-10-second recording of the
force signal on the computer. Note: the signal processing
after the experiment will consist of extracting both the tension
(force) before contraction and the peak force of the contraction so
make sure the signal quality is adequate for these measurements.
- Move the pan a few millimeters further away from the transducer so
that it increases tension on the heart slightly. Again, record a
5-10-second sample of the force signal on the computer.
- Repeat this process in 5-10 small steps until the heart looks
dangerously stretched, at each step recording the force signal on the
computer. Check with the TA or instructor if in doubt about how far to
stretch the heart.
- For the report, construct a plot of peak contraction force versus
pre-tension force and explain which mechanism(s) explains the results.
The pre-tension is the background tension, before (and after) the
time-varying signal from the heartbeat. The peak contraction is the
difference between the peak tension during the contraction and the
pre-tension before the contraction. The resulting plot of peak
contraction versus pre-tension should look something like the
Frank-Starling curves from the text (or class).
- Note: make sure to apply the calibration curve to all the
data you acquire from the lab so that units are in grams. While
force is measured in Newtons not grams, the latter (a unit of mass
not force) is typically used in practice.
Now, to visualize and acquire the electrical signals, carry out the
following steps.
- Attach a T-connector to the second output of the bioamplifier and
split the output between the second channel of the oscilloscope and
channel 1 of the A/D converter.
- Try the following settings on the bioamplifier:
- AC coupling
- A-B mode
- Low filter at lowest frequency setting
- High filter at low to moderate frequency
- Gain at or near maximum
Figure 7:
Exposed heart with applied bipolar
electrodes. The electrodes should touch the exposed heart lightly.
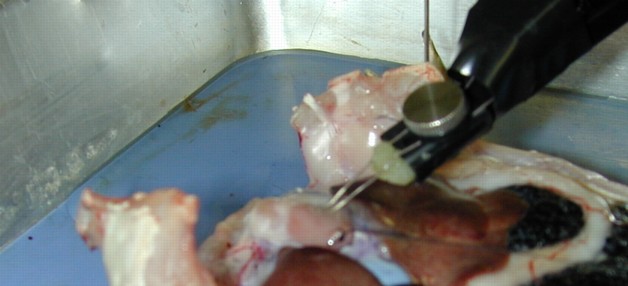 |
Set up an electrogram, the signal recorded directly from the heart
surface, as follows (see Figure 7):
- Take a bipolar electrode holder, attach it to a magnetic stand that
can lift up and down, and place the electrodes in contact with the
heart surface.
- Connect the wire from the electrode to the second input (use the
BNC connection) of the bioamplifier. Connect the reference lead to one
of the pins that hold down the feet of the frog. Adjust the electrode
location so as to get a clean signal of both atrial and ventricular
``electrograms''.
- Record the electrogram together with the contraction signal on the
computer.
Note: Once you have obtained a clean signal, record all settings (amplifier
and CB8ChanScope) in your lab notebook. If you ever change a setting, make
a note in your notebook of the new setting and when you changed it.
- First obtain and save a record of the normal heart
contractions in normal Ringer's solution. Save it as a reference on the
oscilloscope display so that you will be able to observe the changes in
heart rate and contraction strength directly from there.
Repeat this reference recording before each application of a
drug!
- Apply a few drops of the following solutions directly on the heart
and wait long enough to observe their effectsThis may take
several minutes so be patient!!
- Record and save the tension and the electrogram signals on the
computer. Wash with normal Ringer's solution after each solution and
record again. For each intervention, save 10-20 seconds of data. If
necessary, record several times--you can delete extra files later,
however, you cannot come back to re-record signals.
- 2o
mathend000#C Ringer's solution.
- 30 mM of Caffeine.
- 0.5 mM of Cadmium chloride (CdCl2).
- 50
mathend000#M of Epinephrine.
- 1, 5, or 10 mM ACh (start small and only move to a higher
dosage only if there is no effect).
- 1 mg/ml atropine (apply this immediately if the heart stops
beating after the ACh)
- 1 M of Potassium chloride (KCl).
Observe the effect of each intervention on the heart rate and contraction
strength. Record and compare the ECG and contraction signals between the
normal and intervention states. Save the data from the experiment
in Matlab and generate time signal plots to include in your report.
Describe the possible mechanisms of the individual effects based either on
class room material or a literature search.
The lab report this time should include the traditional components:
Introduction, Methods, Results, and Discussion. Do not spend too much time
repeating the methods but focus more on the results and discussion. Keep
in mind the overall goal of characterizing the response of the heart to
external interventions so that for each one, you report what happened and
what the mechanism(s) might have been. As an integrative step, try to tie
these responses to the natural state of the heart and the frog's
interactions with its environment.
Frog Heart Experiment
This document was generated using the
LaTeX2HTML translator Version 2002-2-1 (1.71)
Copyright © 1993, 1994, 1995, 1996,
Nikos Drakos,
Computer Based Learning Unit, University of Leeds.
Copyright © 1997, 1998, 1999,
Ross Moore,
Mathematics Department, Macquarie University, Sydney.
The command line arguments were:
latex2html -split 3 -no_white -link 3 -no_navigation -no_math -html_version 3.2,math -show_section_numbers -local_icons descrip
The translation was initiated by Rob Macleod on 2008-02-09
Rob Macleod
2008-02-09