Notes for Lab #1: Dissection
2012: Rob, Brian, Brett, and the legacy of great TA's
This Lab allows you to identify and compare the size, shape and tissue type
of the major anatomic landmarks of the heart and lungs. The goal of the
lab is not, however, just to observe anatomy but to associate structure
with function. The heart is a pump for blood that comes into the right
atrium, goes out through the right ventricle, returns through the left
atrium, and leaves again through the left ventrical. Imagine this is all
the information you had and imagine you are the first person to be permitted
to dissect one. Try and figure out what the various components are, how
each works, especially how the shape, composition, and even texture of
each part contributes to its function.
Figure 1:
Diagram of cow heart anatomy.
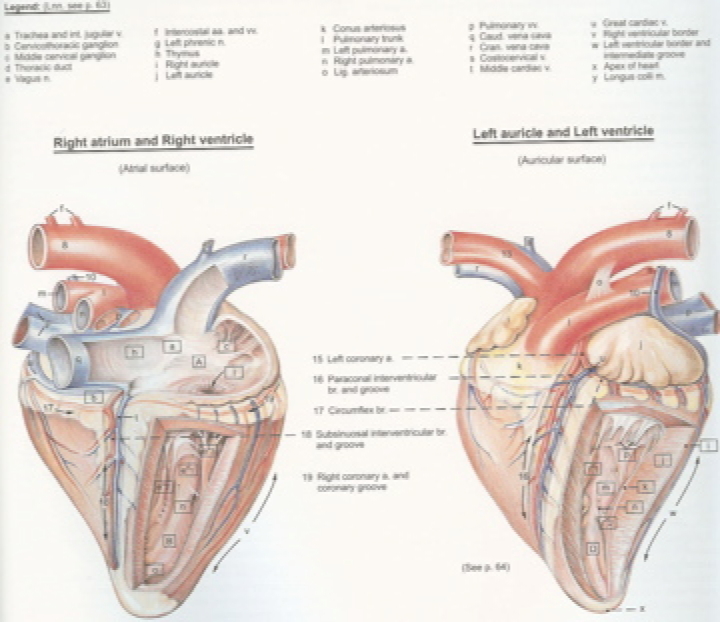 |
Figure 1 shows a diagram for the cow heart geometry that
will be useful during the dissection.
- Obtain dissection kit, rubber/latex gloves, and (optionally)
fashion yourself a dissection apron from the plastic on hand.
- Make sure each group has access to a camera to capture the steps of
the dissection.
- Please use care with the instruments-that are sharp!
- Use gloves to keep hands clean--animal blood and tissues are not
harmful but can be slightly irritating to the skin.
- If necessary, wash your preparation clear of excess blood and
spread it out on your bench space.
- Unpack all the dissection tools from the case and lay them out in
some organized fashion; put the case and other materials out of harm's
way.
- Lay out the heart and lung preparation on the plastic material and
take some time to look at the large scale anatomy of what you have.
Make sure you can tell heart from lungs, left from right. It will get
progressively harder to keep track as you take the preparation apart so
perhaps even mark the left and right lungs at this stage.
- Carefully separate the heart from the rest of the tissue and
dissect it clear, leaving at least a few centimeters of the major
vessels attached. Be especially careful to keep all chambers of the
heart and as much remnant vessls as possible attached.
- Make use of the steps from resources below to help guide the steps
for the dissection with one major deviation. Before opening the
chamber, remove the atria so that the base of the ventricles is
completely visible and it is possible to identify all the vessels and
valves. This also facilitates examing the structure of the atria and
comparing the left and right side by their structure, color, texture
and tactile characteristics.
- Resources:
- http://www.hometrainingtools.com
- If there is no web access, you can see the pages of this dissection
as PDF files (from Dr. Derek Boughner
at
the University of Western Ontario:
- page 1
(http://www.sci.utah.edu/~macleod/bioen/be6000/labnotes/l1-dissect/heartdissection-page1.pdf)
- page 2
(http://www.sci.utah.edu/~macleod/bioen/be6000/labnotes/l1-dissect/heartdissection-page1.pdf)
- page 3
(http://www.sci.utah.edu/~macleod/bioen/be6000/labnotes/l1-dissect/heartdissection-page1.pdf)
- Record all measurements in the table in Section 5
below.
- Note: When dissecting the ventricles, make the first cut
of the right ventricle described above only to within 5 cm. of the base
of the heart, i.e., the part of the heart where ventricles and atria
join. Cutting too far will slice through the tricuspid and mitral
valves but it is better to observe and photograph them first intact
from both the top and the bottom. Observe the valves by looking into
the incision from the apex of the heart (the tip of the ventricles)
toward the base. Only then, continue the cut to that you can open (or
unwrap) the tricuspid valve.
- Make sure to photograph each step so you can include images in the
lab report showing all the items in the table. Take your time and make
lots of photos so you can choose good ones.
- Separate the lungs from the preparation, being careful to preserve
access to the bronchi.
- Try and inflate the lungs via the bronchi using the rubber tubing
connected to the compressed air lines in the lab.
- Slice open the lungs as in the web site and try to expose bronchi
and at least first generation airways (photo).
5 Dissection Worksheet
Fill out as much of the form below as you can. Some boxes are not relevant
(e.g., wall thickness of chordae tendinae) and the choice of size
parameters will depend on the structure, but provide reasonable estimates
for all the values that you can. In the comments section, describe
briefly the notable characteristics of the structure that you observe.
| Cardiac Structure |
Dimensions |
Wall |
Comments |
| |
/Diameter(mm) |
Thickness(mm) |
|
| Whole Heart |
|
|
|
| Superior Vena Cava |
|
|
|
| Inferior Vena Cava |
|
|
|
| Right Atrium |
|
|
|
| Right Ventricle |
|
|
|
| Left Atrium |
|
|
|
| Left Ventricle |
|
|
|
| Mitral Valve |
|
|
|
| Aorta |
|
|
|
| Left Main Coronary |
|
|
|
| Right Main Coronary |
|
|
|
| Aortic Valve |
|
|
|
| Aortic Arch Branch vessels |
|
|
|
| Pulmonary Artery |
|
|
|
| Pulmonic Valve |
|
|
|
| Pulmonary Veins |
|
|
|
| Tricuspic Valve |
|
|
|
| Pulmonary Artery Branch Vessels |
|
|
|
| Chordae Tendinae |
|
|
|
| Pulmonary Structure |
Dimensions |
Wall |
Comments |
| |
/Diameter(mm) |
Thickness(mm) |
|
| Trachea |
|
|
|
| Left Main Bronchus |
|
|
|
| Right Main bronchus |
|
|
|
| 2nd Generation Bronchus |
|
|
|
The lab report should consist of
- Title and your name, as well as the names of your lab partners.
- A brief (0.5-1 page)Introduction to what you did and what
the purpose of the lab was. What was the question and what were the
goals of the lab, as you perceived them? This is a good place to
summarize the background knowledge of what you know about the heart
and lungs going into the dissection. Generally, an introduction
provides all the necessary background for what follows. Also include
some indication of which feature of the heart you
- A concise (1 page) Methods section that describes in general
terms the steps you took and then lists any deviations from the
prescribed sequence or procedures.
- A Results section that includes text and photos of the
major steps of the dissection. There should be images of all the
features listed in the table above, which is not to say a separate
photo for each! In the photos, identify the objects, organs, or
structures of interest. All photos should be digital and incorporated
into the document, i.e., no cutting and pasting of paper photos. Each
photo must be numbered and have a caption. Each figure must have
associated text describing the reader what is notable in the
figure. Also include in this section the table of values you recorded
from the preparation.
- A Discussion section in which you select
one major anatomical feature of the heart, e.g., one valve, coronary
circulation, one chamber, and discuss how its function is related to
its structure. Features you might include in this description are the
shape, the composition and mechanical properties of the tissue, the
texture of any surfaces involved; for each feature, try and suggest
functional significance and how the function is linked to the
structure. This should be at least a half (single-spaced) page of text
and whatever images or supplementary diagrams you think are relevant.
Again, try to describe this as though you were the first to ever make
the connection and provide evidence from your observations for
everything you claim. As with all discussions, begin with an overview
paragraph restating the goals and some high level findings and end with
a summary paragraph reiterating your findings and perhaps some
indication of implications for additional research.
The intended audience for your reports should be your fellow students (not
the instructor) so select language and level of definition and detail
accordingly. Please use sentences and proper grammar in the report. See
the lab report guidelines
on the class web site for additional general suggestions.
Reports should be single column and single spaced and include
color where it is useful. Submit the report electronically via
https://learn-uu.uen.org/courses/98763/assignments/269151
in pdf
format, i.e., not MS Word. Word documents rarely come through
unscathed so try to make PDF documents from them first.
The lab report is due two weeks after the lab, and you will have the
opportunity to submit a second version based on our comments.
Note: Just because you have a second chance on the lab report, if
you submit an incomplete or clearly poorly written report, you will only
waste your time and ours as the suggestions will be obvious and will not
help you get to the level that we expect for future reports.
Notes for Lab #1: Dissection
This document was generated using the
LaTeX2HTML translator Version 2008 (1.71)
Copyright © 1993, 1994, 1995, 1996,
Nikos Drakos,
Computer Based Learning Unit, University of Leeds.
Copyright © 1997, 1998, 1999,
Ross Moore,
Mathematics Department, Macquarie University, Sydney.
The command line arguments were:
latex2html -split 3 -no_white -link 3 -no_navigation -no_math -html_version 3.2,math -show_section_numbers -local_icons descrip
The translation was initiated by Rob Macleod on 2012-02-05
Rob Macleod
2012-02-05